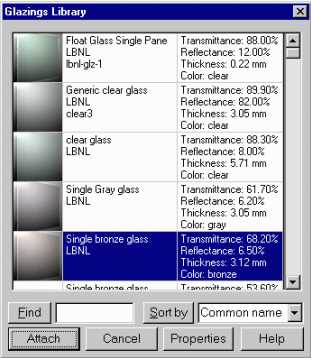
The Glazings Library dialog box contains the database of available glazings that can be attached to surfaces in your drawing. The Desktop Radiance Glazing database is based on glazing data from a program called Optics 5. Optics 5 uses data from the NFRC. For more on Optics 5, see http://windows.lbl.gov/Materials/optics5/.

Figure 4. The Glazings Library Dialog Box
To access the Glazings Library Dialog Box go to RadianceGlazings—>Attach Glazing. The command line prompts you to select the surfaces that the glazing will be attached to. After selecting surfaces you then press <enter> (no more surfaces to select) and the Glazings Library Dialog Box will appear. Scroll through the list and select a glazing to attach to the selected window(s) in your drawing. Next, click the ATTACH button at the bottom of the Glazings library dialog box. Doing so brings back the AutoCAD window and associates the glazing to the selected window. Repeat the process for other windows. For double paned windows, do not make two layers of glass. This will result in incorrect light calculations.
You can sort the database to make it more convenient to find a specific glazing. You may sort the glazings library by the common name of the glazing, its manufacturer, the manufacturer's product code, the source of the data (the person or company that entered it into the database), or by the reflectance, transmittance, or thickness. To sort the glazings, select the desired property in the drop-down list box next to the "SORT BY" button. Then click "SORT BY". You can click again to reverse the sort order.
Alternatively, you may search for a glazing using the FIND function of the Glazings Library Dialog Box. Type the name of the glazing or a sequence of characters matching any other field in the glazing library in the edit box adjacent to the FIND button. Click on the "FIND" button and it will find the first occurrence of the glazing that matches the sequence of characters you have entered. Click on "FIND" again to find next occurrence.