This tutorial assumes a certain familiarity with the UNIX operating system and its text editing facilities. Ask your system administrator for a basic introduction.
The RADIANCE reference manual will be required to understand the following examples of scene creation and program interaction.
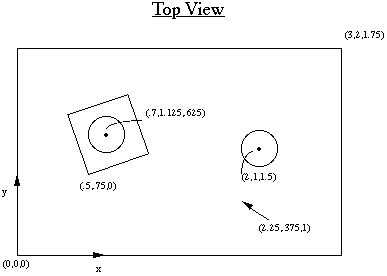
The scene we will be working towards is shown in Figure 1.
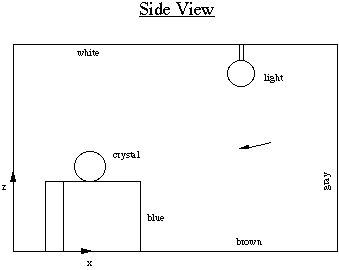
Figure 1
It is usually helpful to start with a simple drawing showing the coordinate axis and the relative locations of major surfaces.
The minimum input required to get an image is a source of illumination and an object to reflect light to the "camera". (In fact, a RADIANCE renderer can be thought of an invisible camera in a simulated world.) We will begin with two spheres, one emissive and one reflective. First we define the materials, then the spheres themselves. Actually, the order is only important insofar as each modifier definition (i.e. material) must appear before its first reference. (Consult the RADIANCE manual for an explanation of the primitive types and their parameters.) Start your favorite text editor ("vi" in this example) to create the following file called "room.rad":
     % vi room.rad
     #
     #  My first scene.
     #

     #
     # The basic primitive format is:
     #
     # modifier TYPE identifier
     # number_string_arguments [string arguments...]
     # number_integer_arguments [integer arguments...]
     # number_real_arguments [real arguments...]
     #
     # The special modifier "void" means no modifier.
     # TYPE is one of a finite number of predefined types, and
     # the meaning of the arguments following is determined by
     # this type.  (See RADIANCE Reference Manual for details.)
     # The identifier may be used as a modifier later
     # in this file or in files following this one.
     # All values are separated by white space
     # (spaces, tabs, newlines).
     #

     # this is the material for my light source:

     void light bright
     0
     0
     3  100  100  100
     #  red_emission  green_emission  blue_emission  #

     # this is the material for my test ball:

     void plastic red_plastic
     0
     0
     5  .7  .05  .05  .05  .05
     #  red  green  blue  specularity  roughness  #

     # here is the light source:

     bright sphere fixture
     0
     0
     4  2  1  1.5  .125
     #  xcent  ycent  zcent  radius  #

     # here is the ball:
     red_plastic sphere ball
     0
     0
     4  .7  1.125  .625  .125
Now that we have a simple scene description, we may look at it with the
interactive viewing program, rvu. First, however,
we must create the "octree" file that will be used
to accelerate the rendering process. To accomplish this, type the following
command:
% oconv room.rad > test.oct
Note that the suffixes ".rad" and ".oct" are not enforced by the program, but
are merely a convenience to aid the user in identifying files later. The
command getinfo can be used to get information
on the origin of binary (unviewable) files created by RADIANCE utilities. Try
entering the command:
% getinfo test.oct
The usefulness of such a function will be apparent when you find yourself with
a dozen files named "test.pic". To make an image of our scene, we must select
a suitable set of view parameters telling RADIANCE where to point its camera.
To simplify our example, we will use the same starting position for all our
renderings, and change views only once
rvu
is started:
% rvu -vp 2.25 .375 1 -vd -.25 .125 -.125 -av .5 .5 .5 test.oct
The "-vp" option gives the view point, and the "-vd" option gives the view
direction vector. The "-av" option specifies the amount of light globally
present in the scene, permitting portions of the scene that are not
illuminated directly to be visible. Rvu has many more options, and
their default values may be discovered using:
% rvu -defaults
You should start to see an image of a red ball forming on your screen.
Take this opportunity to try each of
rvu
's commands, as described in the manual. If you make a mistake in a view
specification, use the last command to get back to where you were. It is
probably a good idea to save your favorite view using the following
command from within
rvu:
: view default.vp
You can create any number of "viewfiles" with this command, and retrieve them
with:
: last viewfile
If you look around enough, you may even be able to see the light source
itself. Unlike many rendering programs, the
light sources
in RADIANCE are visible objects. This illustrates the philosophy behind the
program, which is the simulation of physical spaces. Since it is not
possible to create an invisible light source in reality, there is no
reason to do it in simulation.
Still, there is no guarantee that the user will create physically meaningful descriptions. For example, we have just floated a red ball next to a light source somewhere in intergalactic space. In the interest of making this scene more realistic, let's enclose the light and ball in a room by adding the following text to "room.rad":
     % vi room.rad
     # the wall material:

     void plastic gray_paint
     0
     0
     5  .5  .5  .5  0  0

     # a box shaped room:

     !genbox gray_paint room  3  2  1.75  -i
The generator program
genbox is just a command that produces a RADIANCE description, and it is
executed when the file is read. It is more convenient than specifying the
coordinates of four vertices for each of six polygons, and can be
changed later quite easily. (See the
genbox
manual page for further details.)
You can now look at the modified scene, but remember first to regenerate the octree:
     % oconv room.rad > test.oct
     % rvu -vf default.vp -av  .5  .5  .5  test.oct
This is better, but our ball and light source are still floating, which
is an unrealistic condition for most rooms. Let's put a box under the table,
and a rod to suspend the light from the ceiling:
     # a shiny blue box:

     void plastic blue_plastic
     0
     0
     5 .1 .1 .6 .05 .1

     !genbox blue_plastic box  .5  .5  .5  | xform -rz  15  -t  .5  .75  0

     # a chrome rod to suspend the light from the ceiling:

     void metal chrome
     0
     0
     5  .8  .8  .8  .9  0

     chrome cylinder fixture_support
     0
     0
     7
             2       1       1.5
             2       1       1.75
             .05
Note that this time the output of
genbox
was "piped" into another program,
xform.
Xform is used to move, scale and rotate RADIANCE descriptions. Genbox always
creates a box in the positive octant of 3-space with one corner at the
origin. This was what we wanted for the room, but we wanted the box moved
away from the wall and rotated slightly. First we rotated the box 15 degrees
about the z-axis (pivoting on the origin), then translated the corner from the
origin to (.5,.75,0). By no small coincidence, this position is directly
under our original ball.
After viewing this new arrangement, you can try changing some of the materials -- here are a few examples:
     # solid crystal:

     void dielectric crystal
     0
     0
     5  .5  .5  .5  1.5  0

     # dark brown:

     void plastic brown
     0
     0
     5  .2  .1  .1  0  0

     # light gray:

     void plastic white
     0
     0
     5  .7  .7  .7  0  0
To change the ball from red_plastic to the crystal defined above, simply
replace red_plastic sphere ball with crystal sphere ball. Note once again that
the definition of the new materials must precede any references to them.
Changing the materials for the floor and ceiling of the room is a little more
difficult. Since
genbox
creates six rectangles, all using the same material, it is necessary to replace
the command with its output before we can make the required changes.
To do this, enter the command directly:
% genbox gray_paint room 3 2 1.75 -i >> room.rad
The double arrow ">>" causes the output to be "appended" to the end of the
file, rather than overwriting its contents. Now edit the file and change
the ceiling material to "white", and the floor material to "brown".
(Hint: the ceiling is the polygon whose z coordinates are all high. And
don't forget to remove the original genbox command from the file!)
Once you have chosen a nice view, you can generate a high-resolution image in batch mode using the rpict command:
     % rpict -vf myview -av  .5   .5   .5   test.oct  > test.pic &
     [PID]
The ampersand "&" causes the program to run in the background, so you
can log out and go home while the computer continues to work on your picture.
The bracketed number [PID] printed by the C-shell command interpreter is the
process id that can be used later to check the progress or kill the program.
This number can also be determined by the ps command:
% ps
The number preceding the rpict command is the
process id. If you want to kill the process, use the command:
% kill PID
If you only want a progress report without killing the process, use the form:
% kill -CONT PID
This sends a "continue" signal to
rpict,
which then prints out the percentage completion. Note that this is a
special feature of rpict, and will not work with most programs. Also
note that this works only for the current login session. If you log on later
on a different terminal (or window), rpict will not send the report to the
correct place. It is usually a good idea, therefore, to give rpict an error
file argument if it is running a long job:
% rpict -e errfile ...
Now sending an alarm signal will result in
rpict
reporting to the end of the specified error file. Alternatively, you may use
the -t option to generate reports automatically at regular intervals. You can
check the reports at any time by printing the file:
% cat errfile
This file will also contain a header, and any errors that occurred.
The new polygon for the window wall is shown in Figure 2.
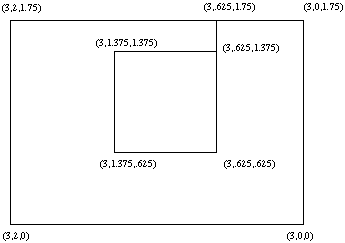
Figure 2. The window wall with a hole cut in it.
To create the window wall, change the appropriate polygon in the scene file . If you haven't done so already, follow the instructions in the previous section to change the genbox command in the file to its corresponding polygons so we may edit them.
     % vi room.rad
     gray_paint polygon room.5137
     0
     0
     30
             3       2       1.75
             3       2       0
             3       0       0
             3       0       1.75
             3       .625    1.75
             3       .625    .625
             3       1.375   .625
             3       1.375   1.375
             3       .625    1.375
             3       .625    1.75
Next, create a separate file for the window. (The use of separate files is
desirable for parts of the scene that will be manipulated independently, as we
will see in a moment.)
     % vi window.rad
     # an 88% transmittance glass window has a transmission of 96%:

     void glass window_glass
     0
     0
     3 .96 .96 .96

     window_glass polygon window
     0
     0
     12
             3       .625    1.375
             3       1.375   1.375
             3       1.375   .625
             3       .625    .625
The vertex order is very important, especially for polygons with holes.
Normally, vertices are listed in counterclock-wise order as seen from the front
(the room interior in this case). However, the hole of a polygon has its
vertices listed in the opposite order. This insures that the seam does not
cross itself. The front of the window should face into our room, since it will
later act as a light source, and light sources only emit from their front
side.
The next step is the description of the scene outside the window. A special purpose generator, gensky, will create a description of the sun and sky which will be stored in a separate file. The arguments to gensky are the month, day and hour (local standard time). The following command produces a description for 10:00am on March 20th at latitude of 40 degrees, longitude 98 degrees:
% gensky 3 20 10 -a 40 -o 98 -m 105 > sky.rad
The file "sky.rad" contains only a description of the sun and the sky
distribution. The actual sky and ground are still undefined, so we will create
another short file containing a generic background:
     % vi outside.rad
     #
     # A standard sky and ground to follow a gensky sun and sky
     # distribution.
     #

     skyfunc glow sky_glow
     0
     0
     4 .9 .9 1.15 0

     sky_glow source sky
     0
     0
     4 0 0 1 180

     skyfunc glow ground_glow
     0
     0
     4 1.4 .9 .6 0

     ground_glow source ground
     0
     0
     4 0 0 -1 180
We can now put these elements together in one octree file using
oconv:
% oconv outside.rad sky.rad window.rad room.rad > test.oct
Note that the above command results in the following error message:
oconv: fatal - (outside.rad): undefined modifier "skyfunc"
The modifier is undefined because we put "outside.rad", which uses
skyfunc before "sky.rad" where skyfunc is defined. It is therefore
necessary to change the order of the files so that skyfunc is defined before
it is used:
% oconv sky.rad outside.rad window.rad room.rad > test.oct
Now let's look at our modified scene, using the same command as before:
% rvu -vf default.vp -av .5 .5 .5 test.oct
As you look around the scene, you will need to adjust the exposure
repeatedly to be able to see detail over the wide dynamic range now present.
To do this, wait a few seconds after choosing each new view and enter the
command:
: exposure 1
or simply:
: e 1
All commands in
rvu
can be abbreviated by one or two letters. Additional control over the
exposure is possible by changing the multiplier factor to a value greater
than one to lighten or less than one to darken. It is also possible to use
absolute settings and spot normalization. See the
rvu
manual entry for details.
You may notice that other than a patch of sun on the floor, the window does not seem to illuminate the room. In RADIANCE, certain surfaces act as light sources and others do not. Whether or not a surface is a light source is determined by its material type. Surfaces made from the material types light, illum, spotlight and (sometimes) glow will act as light sources, whereas surfaces made from plastic, metal, glass and other material types will not.
In order for the window to directly illuminate the room, it is therefore necessary to change its material type. We will use the type illum because it is specially designed for "secondary" light sources such as windows and other bright objects that are not merely emitters but have other important visual properties. An illum will act as a light source for parts of the calculation, but when viewed directly will appear as if made from a different material (or disappear altogether). Rather than modify the contents of "window.rad" which is a perfectly valid description of a non-source window, let's create a new file, which we can substitute during octree creation, called "srcwindow.rad":
     % vi srcwindow.rad
     #
     # An emissive window
     #

     # visible glass type for illum:

     void glass window_glass
     0
     0
     3 .96 .96 .96

     # window distribution function, including angular
     # transmittance:

     skyfunc brightfunc window_dist
     2 winxmit winxmit.cal
     0
     0

     # illum for window, using 88% transmittance at normal
     # incidence:

     window_dist illum window_illum
     1 window_glass
     0
     3 .88 .88 .88

     # the source polygon:

     window_illum polygon window
     0
     0
     12
             3       .625    1.375
             3       1.375   1.375
             3       1.375   .625
             3       .625    .625
There are a couple of things you should notice in this file. The first
definition is the normal glass type, window_glass, which is used for the
alternate material for the illum window_illum. Next is the window
distribution function, which is the sky distribution modified by angular
transmittance of glass defined in winxmit.cal. Finally comes the illum
itself, which is the secondary source material for the window.
To look at the scene, simply substitute "srcwindow.rad" for "window.rad" in the previous oconv command, thus:
% oconv sky.rad outside.rad srcwindow.rad room.rad > test.oct
You can look at the room at different times by changing the
gensky
command used to create "sky.rad" and regenerating the octree. (Although the
octree does not strictly need to be recreated for every change to the input
files, it is good to get in the habit until the exceptions are well understood.)
Here is a minimal control file, which we'll call "simple.rif":
     # My first "rad input file"
     ###########################
     # First, we must specify the "ZONE" for this scene,
     # which gives the
     # x, y and z dimensions of our space.  The 'I' stands
     # for "interior",
     # since we are interested in the inside of this space:

     # xmin xmax ymin ymax zmin zmax
     ZONE= I  0 3  0 2  0 1.75

     ###########################
     # Next, we need to tell rad what scene input files to
     # use and in what order.  For this, we use the lower
     # case variable "scene", which allows multiple values.
     # Literally, all the values are concatenated by rad,
     # in the order we give them, on the oconv command line:

     scene= sky.rad outside.rad
     scene= srcwindow.rad
     scene= room.rad

     ###########################
     # Technically, we could stop here and let rad figure
     # out the rest, but it is very useful to also give
     # an exposure value that is appropriate for this scene.
     # We may discover this value from within rvu using
     # the "e =" command once we have found the exposure
     # level we like.  For the interior of our space under
     # these particular lighting conditions, an exposure
     # value of 0.5 works well:

     # This could also have been given as "-1" (f-stops)
     EXPOSURE= 0.5
Once we have this simple input file, we can start using
rad
to run our commands for us, eg:
% rad -o x11 simple.rif
The -o option tells
rad
to run
rvu
under X11 instead of creating pictures (the default action) using
rpict.
If you are using a different window system, then you should substitute the
appropriate driver module for x11. To discover what modules are available
with your version of rvu, type:
% rvu -devices
Once started,
rad
shows us the commands as it executes them, first
oconv
then
rvu
.
Since we didn't specify a view in our control file, rad picks one for us, which it calls "X". This is one of the standard views, and it means "from the maximum x position." As another example, the view "yZ" would be from the minimum y and maximum z position. The actual positions are determined from the "ZONE" specification, and are just inside the boundaries for an interior zone, and well outside the boundaries for an exterior zone. (Please take a few moments at this time to consult the rad (1) manual page under "view" to learn more about these standard identifiers.) We could have selected a different standard view on the command line using the -v option, eg:
% rad -o x11 -v Zl simple.rif
This specification gives us a parallel projection from "Z", the maximum z
position (ie. a plan view). Rather than executing another rad command, we can
get the same view functionality from within
rvu
using the "L" command. (This is a single-letter command, corresponding roughly
to the "last" command for retrieving views from files, explained
earlier.)
This command actually consults rad using the current control file to compute
the desired view. The complementary "V" command appends the current view to the
end of the control file for later access and batch rendering. For example,
you can put the default viewpoint into your control file using the
rvu
commands:
: last default.vp
followed by:
: V def.
(Shorter view names are better because they end up being part of the
picture file name, which can get quite long.) Move around in
rvu
to find a few different views you like, and save them (with sensible names)
to the control file using the "V" command. If you make a mistake and save a
view you later decide you dislike, you must edit the control file and manually
remove the corresponding line.
Looking through the rad manual page, you will notice that there are many variables we have left unspecified in our simple control file. To discover what values these variables are given, we can use the -e option (together with -n and -s to avoid actually doing anything):
% rad -e -n -s simple.rif
Some of these default values do not make sense for our scene. In
particular, the
VARIABILITY
is not "Low", because there is sunlight entering our space. We should also
change the
DETAIL
variable from "Medium" to "Low" because our space is really quite simple. Once
we are satisfied with the geometry in our scene, we will probably want to
raise the
quality
of output from the default value of "Low". It is also a good idea to
specify an ambient file name, so renderings requiring an indirect calculation
will be more efficient. We may add the following lines to "simple.rif" to
correct these problems:
     # We may abbreviate VARIABILITY with just 3 letters
     VAR= High

     # Anything starting with upper or lower case 'L' is LOW
     DET= L

     # Go for a medium quality result
     QUAL= Med

     # The file in which to store indirect values
     AMB= simple.amb
If we want to create picture files for the selected views in batch mode, we can
run
rad
in the background, ie:
% rad simple.rif &
This will, of course, echo the commands before they are executed, which may be
undesirable for a background job. So, we can use the "silent" mode instead:
% rad -s simple.rif &
Better still, we may want rad to record the commands executed, along with any
error reports or other messages, to an error file:
% rad simple.rif >& errs &
The ">&" notation is recognized by the C-shell to mean, "redirect both the
standard output and the standard error to a file." Bourne shell users should use
the following form, instead:
% rad simple.rif > errs 2>&1 &
     # Terra Firma:

     void plastic ground_mat
     0
     0
     5 .28 .18 .12 0 0

     ground_mat ring groundplane
     0
     0
     8
             0       0       -.01
             0       0       1
             0       30

     # A big, ugly, mirrored glass building:

     void mirror reflect20
     0
     0
     3 .15 .2 .2

     !genbox reflect20 building 10 10 2 | xform -t 10 5 0
Note that the groundplane was given a slightly negative z value. This is
very important so that the ground does not peek through the floor we have
defined. The material type
mirror,
used to define the neighboring structure, is special in RADIANCE. Surfaces of
this type as well as the types
prism1
and
prism2
participate in something called the "virtual light source" calculation. In
short, this means that the surfaces of the building we have created will
reflect sunlight and any other light source present in our scene. The
virtual light source material types should be used with care since they can
result in substantial growth in the calculation. It would be a good idea in
the example above to remove the bottom surface of the building (which cannot
be seen from the outside anyway) and change the roof type to metal or some
non-reflecting material. This can be done using the same manual process
described earlier for changing the room surface materials.
Now that we have a better description of the outside, what do we do with it? If we simply substitute it in our scene without changing the description of the window illum, the distribution of light from the window will be slightly wrong because the "skybright" function only describes light from the sky and the ground, not from other structures. Using this approximation might be acceptable in some cases, but other times it is necessary to consider outside geometry and/or shading systems to reach a reasonable level of accuracy. There are two ways to an accurate calculation of light from a window. The first is to treat the window as an ordinary window and rely on the default interreflection calculation of RADIANCE, and the second is to use the program mkillum to calculate the window distribution separately so we can still treat it as an illum light source. Let's try them both.
Using the default interreflection calculation is probably easier, but as we shall see it takes a little longer to get a good result in this case. To use the interreflection calculation, we modify the "scene" specification and a few other variables in "simple.rif" to create a new control file, called "inter.rif":
     ZONE= I  0 3  0 2  0 1.75

     # new exterior description
     scene= sky.rad outside2.rad

     # go back to simple window
     scene= window.rad
     scene= room.rad

     EXP= 0.5
     VAR= High
     DET= L
     QUAL= Med

     # Be sure to use a unique name here
     AMB= inter.amb

     # One bounce now for illumination
     INDIRECT= 1

     view= def -vp 2.25 .375 1 -vd -.25 .125 -.125
To look at the scene with
rvu,
simply run:
% rad -o x11 inter.rif
Probably the first thing you notice after starting
rvu
is that nothing happens.
It takes the calculation a while to get going, as it must trace many rays at
the outset to determine the contribution at each point from the window
area. Once
rvu
has stored up some values, the progress rate improves, but it never really
reaches blistering speed. A more efficient alternative in this case is to use
the program
mkillum
to create a modified window file that uses calculated data values to define
its light output distribution. Applying
mkillum
is relatively straightforward in this case. Simply create a new control file
from "inter.rif", and name it "illum.rif", making the following changes:
     ZONE= I  0 3  0 2  0 1.75
     scene= sky.rad outside2.rad
     scene= room.rad

     # window will be made into illum
     illum= window.rad

     EXP= 0.5
     VAR= High
     DET= L
     QUAL= Med

     # Be sure to use a unique name here
     AMB= illum.amb

     # No interreflections necessary with illum
     INDIRECT= 0

     # Options for mkillum
     mkillum= -av 18 18 18 -ab 0

     view= def -vp 2.25 .375 1 -vd -.25 .125 -.125
The -av value given to
mkillum
is appropriate for the outside, which is much brighter, as suggested by the
output of the
gensky
command stored in "sky.rad". The -ab option is set to 0, because outside
the building we do not expect interreflections to play as important a role as
in the interior (plus we are trying to save some time). To view the scene
interactively, we again use
rad:
% rad -o x11 illum.rif
You will notice that the calculation proceeds much more quickly, and even
produces a smoother looking result. Aside from waiting for
mkillum
to finish, there is an additional price for this speed advantage, however.
The contribution from the sun patch on the floor is no longer being
considered, since we are not performing an interreflection calculation inside
our space. The light from the window is being taken care of by the
mkillum
output, but the solar patch is not. In most cases, we endeavor to prevent
direct sun from entering the space, and in the morning hours this is true for
our model, but otherwise it is necessary to use the diffuse interreflection
calculation to correctly account for all contributions. Note that the
interreflection calculation is turned on automatically when the
"QUALITY"
variable in the control file is changed to "High".
Let's start by generating a fisheye picture of our design space:
     % echo view= fish -vta -vp 1.5 .8 1 -vd 0 1 0  -vh
     240 -vv 180 >> illum.rif
     % rad -v fish illum.rif
This picture will be used to identify sources of glare from a particular view
point (1.5, 1, 1) about a particular direction (0, 1, 0). Since RADIANCE
pictures contain true floating point radiance values, they can be used to
analyze a visual environment for problems such as discomfort glare. Once
rpict
has finished (and this may take the several minutes), you may display the
image using
ximage
or whatever display program you have available on your system. A fisheye
perspective is a type of distortion that allows a wider field of view than a
standard perspective image. This larger field is used by the program
findglare
to locate any and all bright spots that might affect visual comfort.
Findglare can also use direct calculation with
rtrace,
but this takes a long time without providing the nice visual feedback one
gets from an image.
To facilitate the use of findglare and the associated programs glarendx and xglaresrc, a script has been written called glare. This script asks you some questions and to make it a little easier to get a nice result. To start the script, simply type glare on the command line. When it asks you a name for the glare file you want to work with, enter something innocuous like "test.glr". It will tell you that the file does not exist, so we will have to create it. It then prompts you for the name of the picture and the name of the octree, which are "fish.pic" and "test.oct", respectively. When it asks for the view, just hit return because we want to use the default view from the picture file. Glare then asks what parameters it should use for the rtrace calculation. (Findglare will still use rtrace to calculate any points that it needs which are off the picture we have given it.) For this, you should give the -av setting from before (1 1 1). Then glare will ask you if the sources of glare are small, which they are not, and if you would like to set the glare threshold manually, which you would not. Finally, you will be asked what maximum angle you want to calculate away from the view center. Let's use 60 degrees (to the right and left). Glare then proceeds to call the program findglare to locate the actual glare sources. Once findglare has finished, glare will call the program xglaresrc (if you are running X11) to circle the glare sources found on the image.
You then have a choice of a few different glare indices you may have calculated from the computed sources. The Guth visual comfort probability (VCP) is perhaps the easiest to understand for those who are not familiar with glare metrics, because it gives a result in terms of a percentage of people who would be satisfied. Calculating the Guth VCP in this case, looking straight ahead (ie. 0 degrees), we see that less than 15% of the people would find this visual environment comfortable. Although the visual comfort probability increases as we look to the left (positive angles), it never gets over 20% for the range of angles we've given. That is primarily because the window is unshielded and very near the horizontal line of sight. Skylights and ceiling fixtures are a little nicer from a glare standpoint for that reason.
11/15/93